Making
Homemade Ice Cream
 |
| (http://food.sndimg.com/img/recipes/37/37/7/large/pic6ishTi.jpg) |
Have you
ever wanted to try making your own homemade ice cream? Have you not done it
just because you thought you needed an ice cream machine to do it? Well, there
are a few different ways to make homemade ice cream without an ice cream maker.
All you need is a handful of ingredients, the proper utensils, and a little
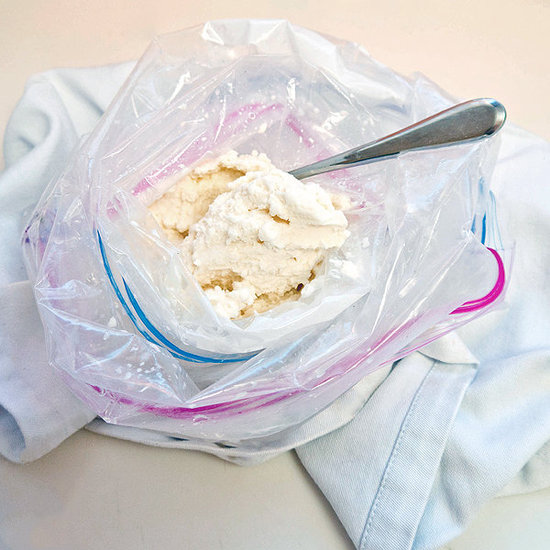
time. One fast and easy way to make homemade ice cream is by making it in a
plastic bag. Another way you can do this requires the use of a stove and the
correct cooking utensils. Each way is simple, but depending on the materials
you have one will be easier to do than the other. If you don’t have a lot of
time and want a quick snack in no time you can make the ice cream with the
plastic bag method. If you want more ice cream and have time, the proper
cooking utensils, and a stove you can use this other cooking method.
Making
ice cream can give you something to do when you’re bored, hungry for a snack,
or want to try something new. Making your own ice cream can save you money and
you can show these different methods to your friends, family, or children. It
can be an enjoyable activity and the end results are amazing. The ice cream is
delicious and satisfying. These processes take just a short time to do and are
simple and easy to complete. Using the plastic bag method is easy enough for
almost anyone to do, even young children. The stove method is a little more
advanced and not recommended for young children unless accompanied by an adult.
We’ve
decided to give you a couple different ways to make your own homemade ice cream
because we know people may have the proper materials to make it one way, but
maybe not the other. The bag method is simpler and can be something fun to do
with your friends, whereas the stove method may produce higher quality ice
cream and be something you’d do to challenge yourself in the kitchen.
Making
Homemade Ice Cream in a Bag
Ingredients/Materials:
 | |
|
|
- 1/2 cup milk (whole or 2% work best) or half and half
- 1/2 cup heavy cream (optional)
- 1/2 teaspoon vanilla
- 1 tablespoon sugar
- 4 cups ice cubes or crushed ice
- 4 tablespoons salt
- 2 quart-sized plastic food storage bags
- 1 gallon-sized plastic food storage bag
- A hand towel or winter gloves
|
How to
Make It:
In one of
the quart-sized bags combine the milk, sugar, and vanilla (and heavy cream if
you want).
| ||||||||||||||||
|
Careful
squeeze as much air out of the bag as possible and seal it tightly. Excess air
in the bag could cause it to open during the mixing process, which wouldn’t be
good.
Put the
bag of ingredients you just combined into the other quart-sized bag. Squeeze
the air out of this bag as well and seal it. By double-bagging, there is less
of a chance of salt and water leaking into your ice cream.
Next, put
the quart-sized bags inside the gallon sized bag. It is best to use a
gallon-sized freezer bag for this rather than just any plastic food storage bag
because they are tougher and less likely to be punctured or torn open while
making the ice cream.
Once
you have the smaller bags in the larger bag add the ice and salt into the
larger bag, covering and surrounding the small bags. You can use table salt for
this, though Kosher or rock salt will work better for you. Squeeze the air out
of this bag and seal it tightly.If
you’re using a towel wrap the towel around the bag. If not, put your gloves on.
Then, shake and massage the mixture. Continue doing this until the ice cream is
at the consistency you want. This will take about five to ten minutes to do. You
can then remove the quart-sized bags from the gallon-sized bag and eat your ice
cream. You may want to rinse the outer quart-sized bag to be sure the salt is
off it and doesn’t get into your ice cream. You can
then eat your treat right out of the bag, put it into a bowl, or enjoy it in a
cone.
Other Tips/Things to Consider:
You
can try using different amounts of vanilla and sugar to get your preferred
sweetness and taste.
You
can also add food coloring to the mixture to change your ice cream snack from a
boring white color to something more fun.
Feel
free to add sprinkles, fruit, or other toppings to your ice cream once it’s
done to make it more enjoyable.
If
you’re going to eat your ice cream from a bowl something you may want to do
before starting this whole process is to put your bowl in the freezer. This
will keep the bowl cool and allow the ice cream to stay frozen longer while
you’re eating it.
If
there is snow on the ground when you’re making your own ice cream the snow can
be a substitute for ice. Just go outside, scoop some up, and put it into the
gallon-sized bag.
This
recipe is for making a small amount of ice cream for you to personally eat. If
you want to have more ice cream for yourself or need to make some for other
people as well, just double the amounts of ingredients you’re using. Be aware
that there is only so much you can fit in the bags and the more of the mixture
you have in the bag the longer it will take to get it all to the consistency
you’re looking for. Enjoy!
Making
Homemade Ice Cream (Stove Method)
Ingredients:
Scalding Milk
Pour
the 1 cup of milk into a 2 quart saucepan. Over a medium heat of 175 degrees
Fahrenheit allow the milk to gently simmer until it bubbles around the edges of
the saucepan. Be sure to stir it continuously, so it doesn't burn. Remove the
saucepan from the heat once it begins to simmer.
After
removing the saucepan from the heat add the 1 cup of sugar and ¼ teaspoon of
salt into the scalded milk. Stir the milk until the sugar and salt are
completely dissolved and you cannot see any more solid pieces. Then, add in the
1 cup of half and half, ½ tablespoon of vanilla extract, and 2 cups of the
chilled whipped cream. Continue stirring until you have a creamy mixture.
Cooling/Chill
and Age the Mixture
Pour the
contents from the saucepan into a 1 quart bowl to allow the mixture to cool to
room temperature (68 degrees Fahrenheit). Once the mixture has gotten to room
temperature cover the top of the bowl with plastic wrap and allow the mixture
to age in the refrigerator for 4 hours. Doing this helps produce ice cream with
more body and makes it have a smoother texture.
After the
4 hours are up remove the mixture from the fridge and stir it. Transfer the
mixture into a freeze safe bowl. Again, cover the top of the bowl with plastic
wrap. Place the bowl into the freezer for about 2 hours. Once the 2 hours are
up stir the mixture and break apart the ice crystals that are starting to form.
You can either use a mixing spoon during this step or an electric mixer. The
mixture shouldn’t be too soft where it is still in a liquid state, so if it
isn’t thick enough return it to the freezer for another 2 hours. Repeat this
process until the ice cream is thick enough. Once thick enough add any other
ingredients you may want to the mixture.
Once
your ice cream is thick enough pour it into a plastic freezer container. Make
sure you leave at a ½ inch of space for the expansion of the ice cream. Once
again, cover the container and place it into the freezer until the ice cream
becomes firm (roughly 2 hours). After the ice cream has hardened properly you
can scoop the ice cream into bowls or cones and then serve and enjoy.

Now that
you know there are ways to make homemade ice cream without an ice cream machine
we hope you are willing to give at least one of the methods a try. As you could
tell from reading this it can be rather simple. You just need a small number of
ingredients, the proper materials, and a little time. It can be something fun
to learn and try for the first time and you can show it to your friends and
family. Almost anyone can make ice cream using the bag method. Zach and I have
both made it using the bag method and enjoyed doing so. If you know some young
children, you can help them do this and they will have a blast with it. The ice
cream doesn’t take long to make and it tastes delicious. Hopefully you’ve
learned something new and enjoyed reading our post. Bon appétit!
|


Possess lot of homework? Don't want spend some time on writing? Use this essay service essay-writing-place.com. Just simply you can pay out quite a few money to get perfect essay from a professional
ReplyDelete
ReplyDeleteWhat you get from RSC Bux - Main Benefits :
Earn from home
Garneted ads daily
Detailed statistics
forum permissions
Upgrade plans
Instant Payment
Reach millions of clients
Easy management
Demographic filter
Affordable rates
Anti-cheat protection
Detailed statistics
WWW.RSCBUX.COM
bux
the rsc bux
advertising
perfect money
get Free Money Online